Figure 7.1: Gate coordinate system
Do you know the game Portal * 1 ? A puzzle action game released by Valve in 2007. It is a god game. The feature is a hole called a portal, and you can see the scenery on the other side as if the two holes are connected by a worm home, and you can warp through objects and your character. The point is Anywhere Door. You can set up a portal on a flat surface with a gun called a portal gun, and use this to advance the game. This chapter is an article that tried to implement the function of this portal in Unity while being simple. The sample is "PortalGate System" of
https://github.com/IndieVisualLab/UnityGraphicsProgramming3
.
[*1] https://ja.wikipedia.org/wiki/Portal_(%E3%82%B2%E3%83%BC%E3%83%A0)
Think about the necessary elements as a place to play on the portal.
I want a hit. Your character may be visible on the other side of the portal, so it's a first-person perspective, but you'll need a full-body model. This time, I used the Adam * 2 model distributed by Unity . Also, I want to see the objects warping other than my character, so I can launch a red ball with the E button.
[*2] https://assetstore.unity.com/packages/essentials/tutorial-projects/adam-character-pack-adam-guard-lu-74842
The operation method is as follows.
From now on, the hole to warp is called a gate. The class name is PortalGate in the source code .
My character was created by modifying Unity's Standard Assets * 3 . It's like using the animation of ThirdPersonChracter while modifying the control of FirstPersonCharacter. Field of view because if (the main camera) to the user's character itself will be reflected polygon is not clean Dari sinks Player in the main camera provided a layer Player we try to not displayed to set the layer to the camera of CullingMask.
[*3] https://assetstore.unity.com/packages/essentials/asset-packs/standard-assets-32351
For the field, I used unity3d-jp 's level design asset playGROWnd * 4 . Somehow the atmosphere is like Portal. This time, the field is a rectangular parallelepiped room to simplify the rest of the process. Collisions are not used as they are, but transparent collisions are placed on each side of the rectangular parallelepiped. The floor collision is wider than the room to prevent it from falling, as the post-warp object may be partially outside the room. This is the Stage Coll layer.
[*4] https://github.com/unity3d-jp/playgrownd
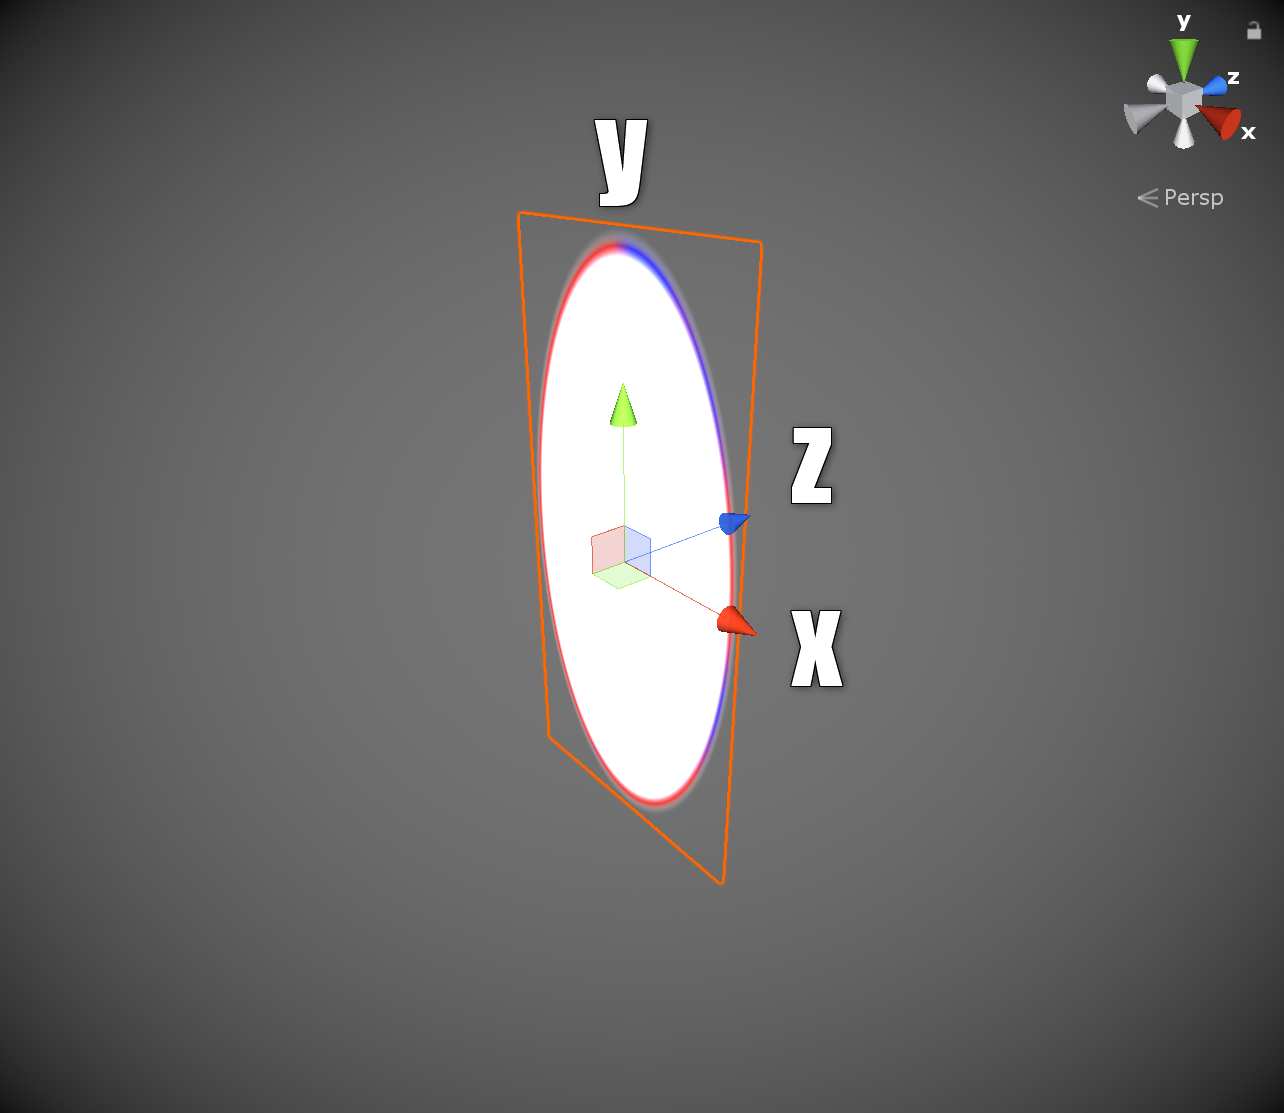
Now let's implement the gate. The gate this time is oriented to spread on the XY plane in the local coordinate system and pass through the Z + direction.
Figure 7.1: Gate coordinate system
The outbreak follows the original portal, so that when you click the mouse, the gate will appear on the plane of the viewpoint, and left-click and right-click will connect each other as a pair. If there is already a gate, the old gate will disappear on the spot and a new gate will open. Internally, the old gate has been moved to a new location and is the earliest.
PortalGun.cs
void Shot(int idx)
{
    RaycastHit hit;
    if (Physics.Raycast(transform.position,
        transform.forward,
        out hit,
        float.MaxValue,
        LayerMask.GetMask(new[] { "StageColl" })))
    {
        var gate = gatePair [idx];
        if (gate == null)
        {
            var go = Instantiate(gatePrefab);
            gate = gatePair[idx] = go.GetComponent<PortalGate>();

            var pair = gatePair[(idx + 1) % 2];
            if (pair != null)
            {
                gate.SetPair(pair);
                pair.SetPair(gate);
            }
        }

        gate.hitColl = hit.collider;

        var trans = gate.transform;
        var normal = hit.normal;
        var up = normal.y >= 0f ? transform.up : transform.forward;

        trans.position = hit.point + normal * gatePosOffset;
        trans.rotation = Quaternion.LookRotation(-normal, up);

        gate.Open();
    }
}
By specifying only the StageColl layer transform.forward, the ray is skipped in the direction and the hit is confirmed. If there is a hit, the gate operation is processed. First, check if there is an existing gate, and if not, generate it. Pairing is also done here. PortalGate.hitCollSet the collider that Ray collided with for later use , and ask for the position and orientation. The position is slightly lifted in the normal direction from the plane where it collided, and Z-fighting measures are taken. Did you notice that the way to find the orientation is a little strange? The specification of the up vector of Quaternion.LookRotation () is changed by the positive or negative of normal.y. Normally, transform.up is fine, but when the gate is put out on the ceiling, the front and back (Y direction of PortalGate) will be reversed and it will feel strange, so I did it like this. I think the original Portal also behaved like this.
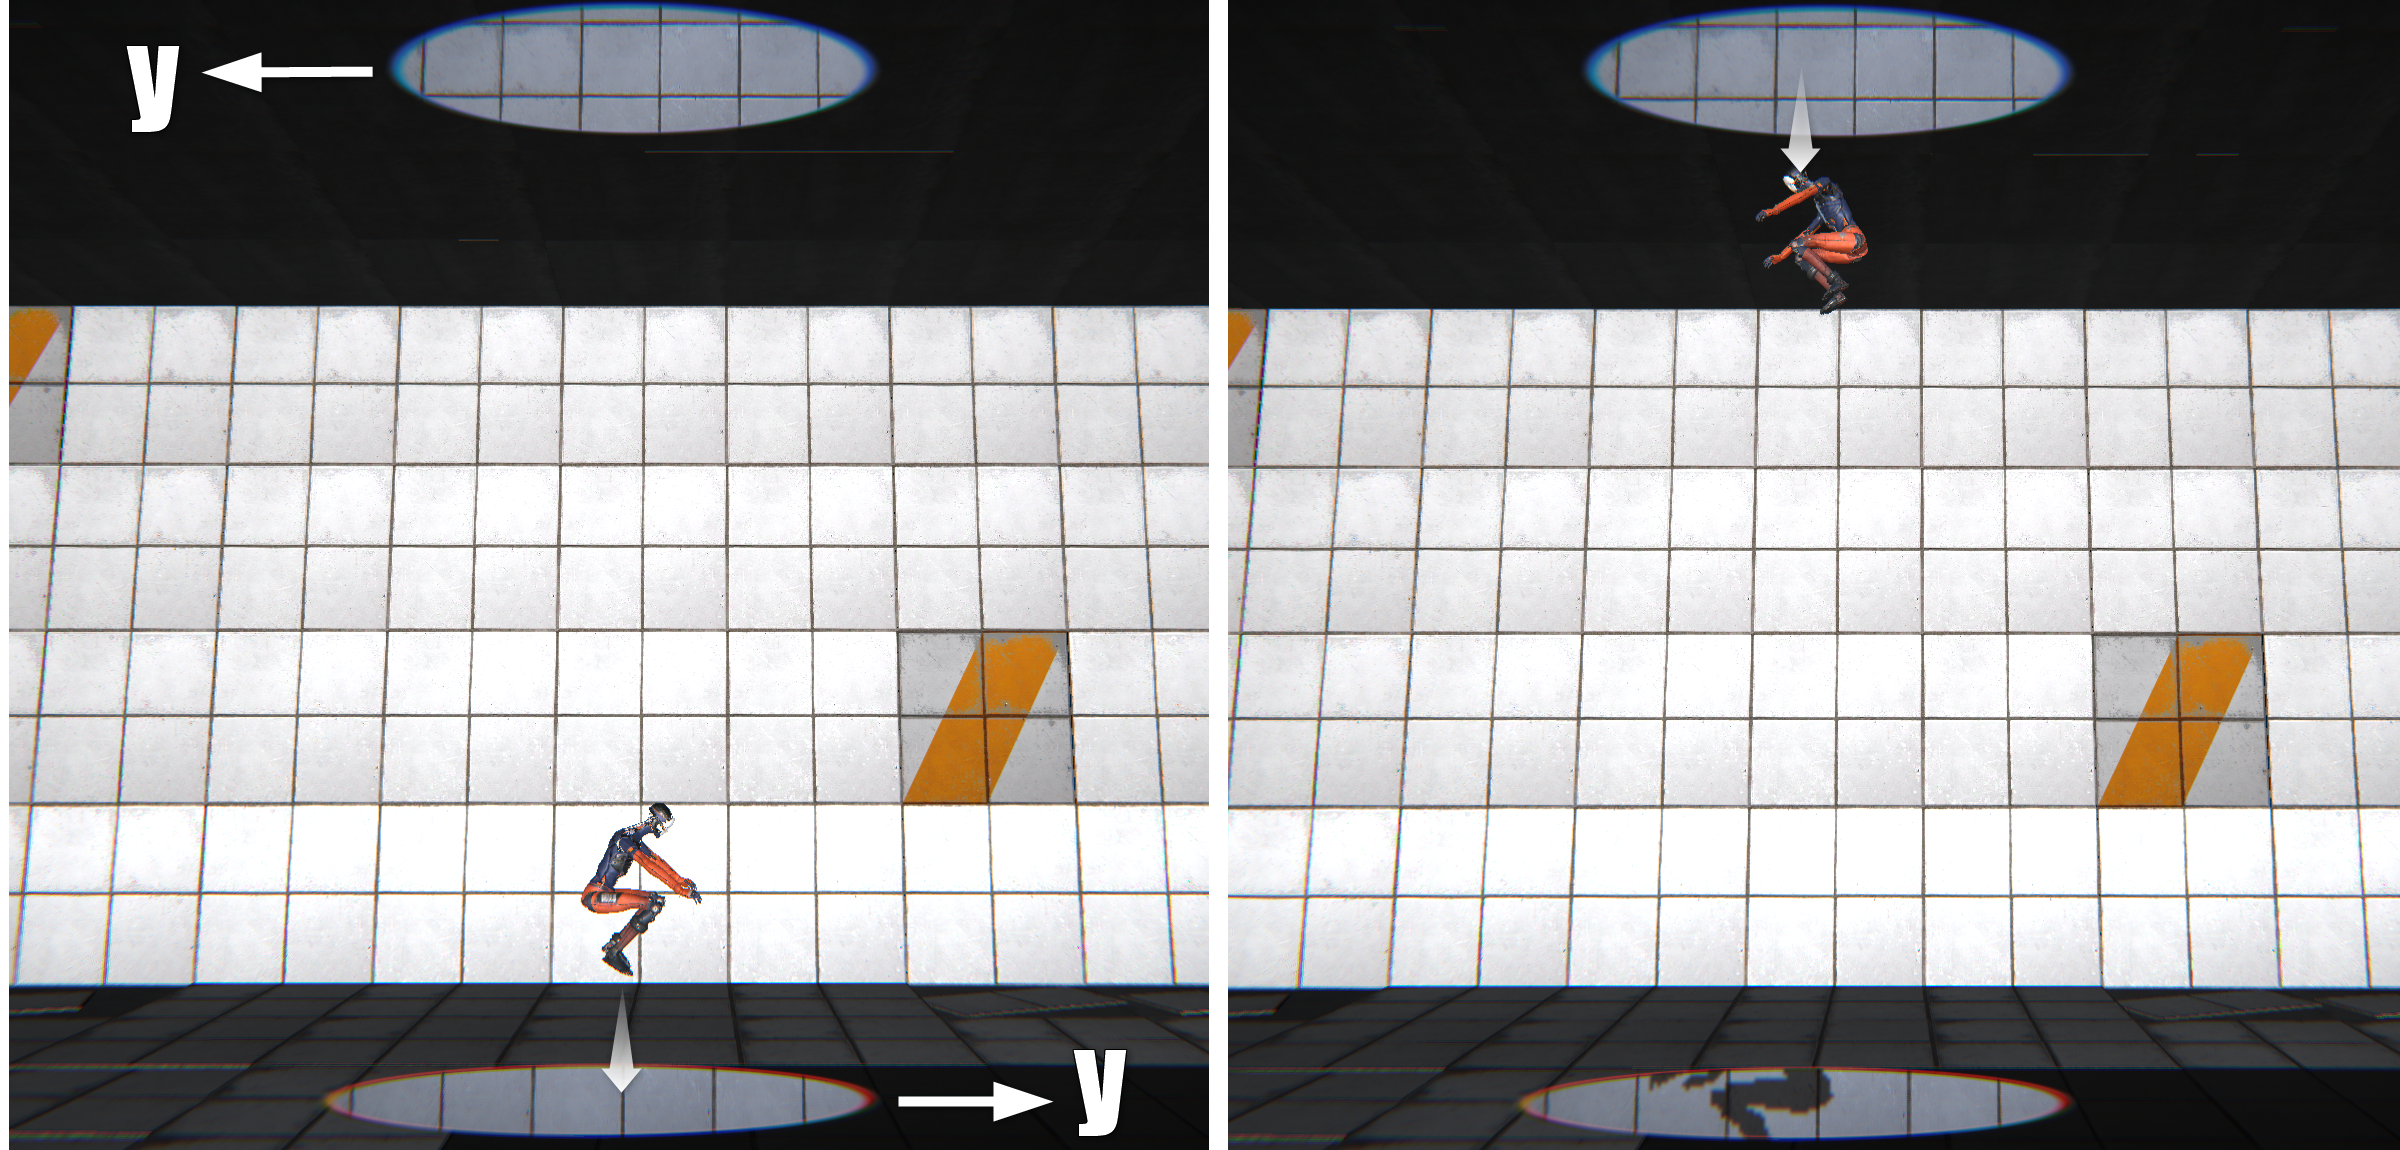
Figure 7.2: Without up-vector processing
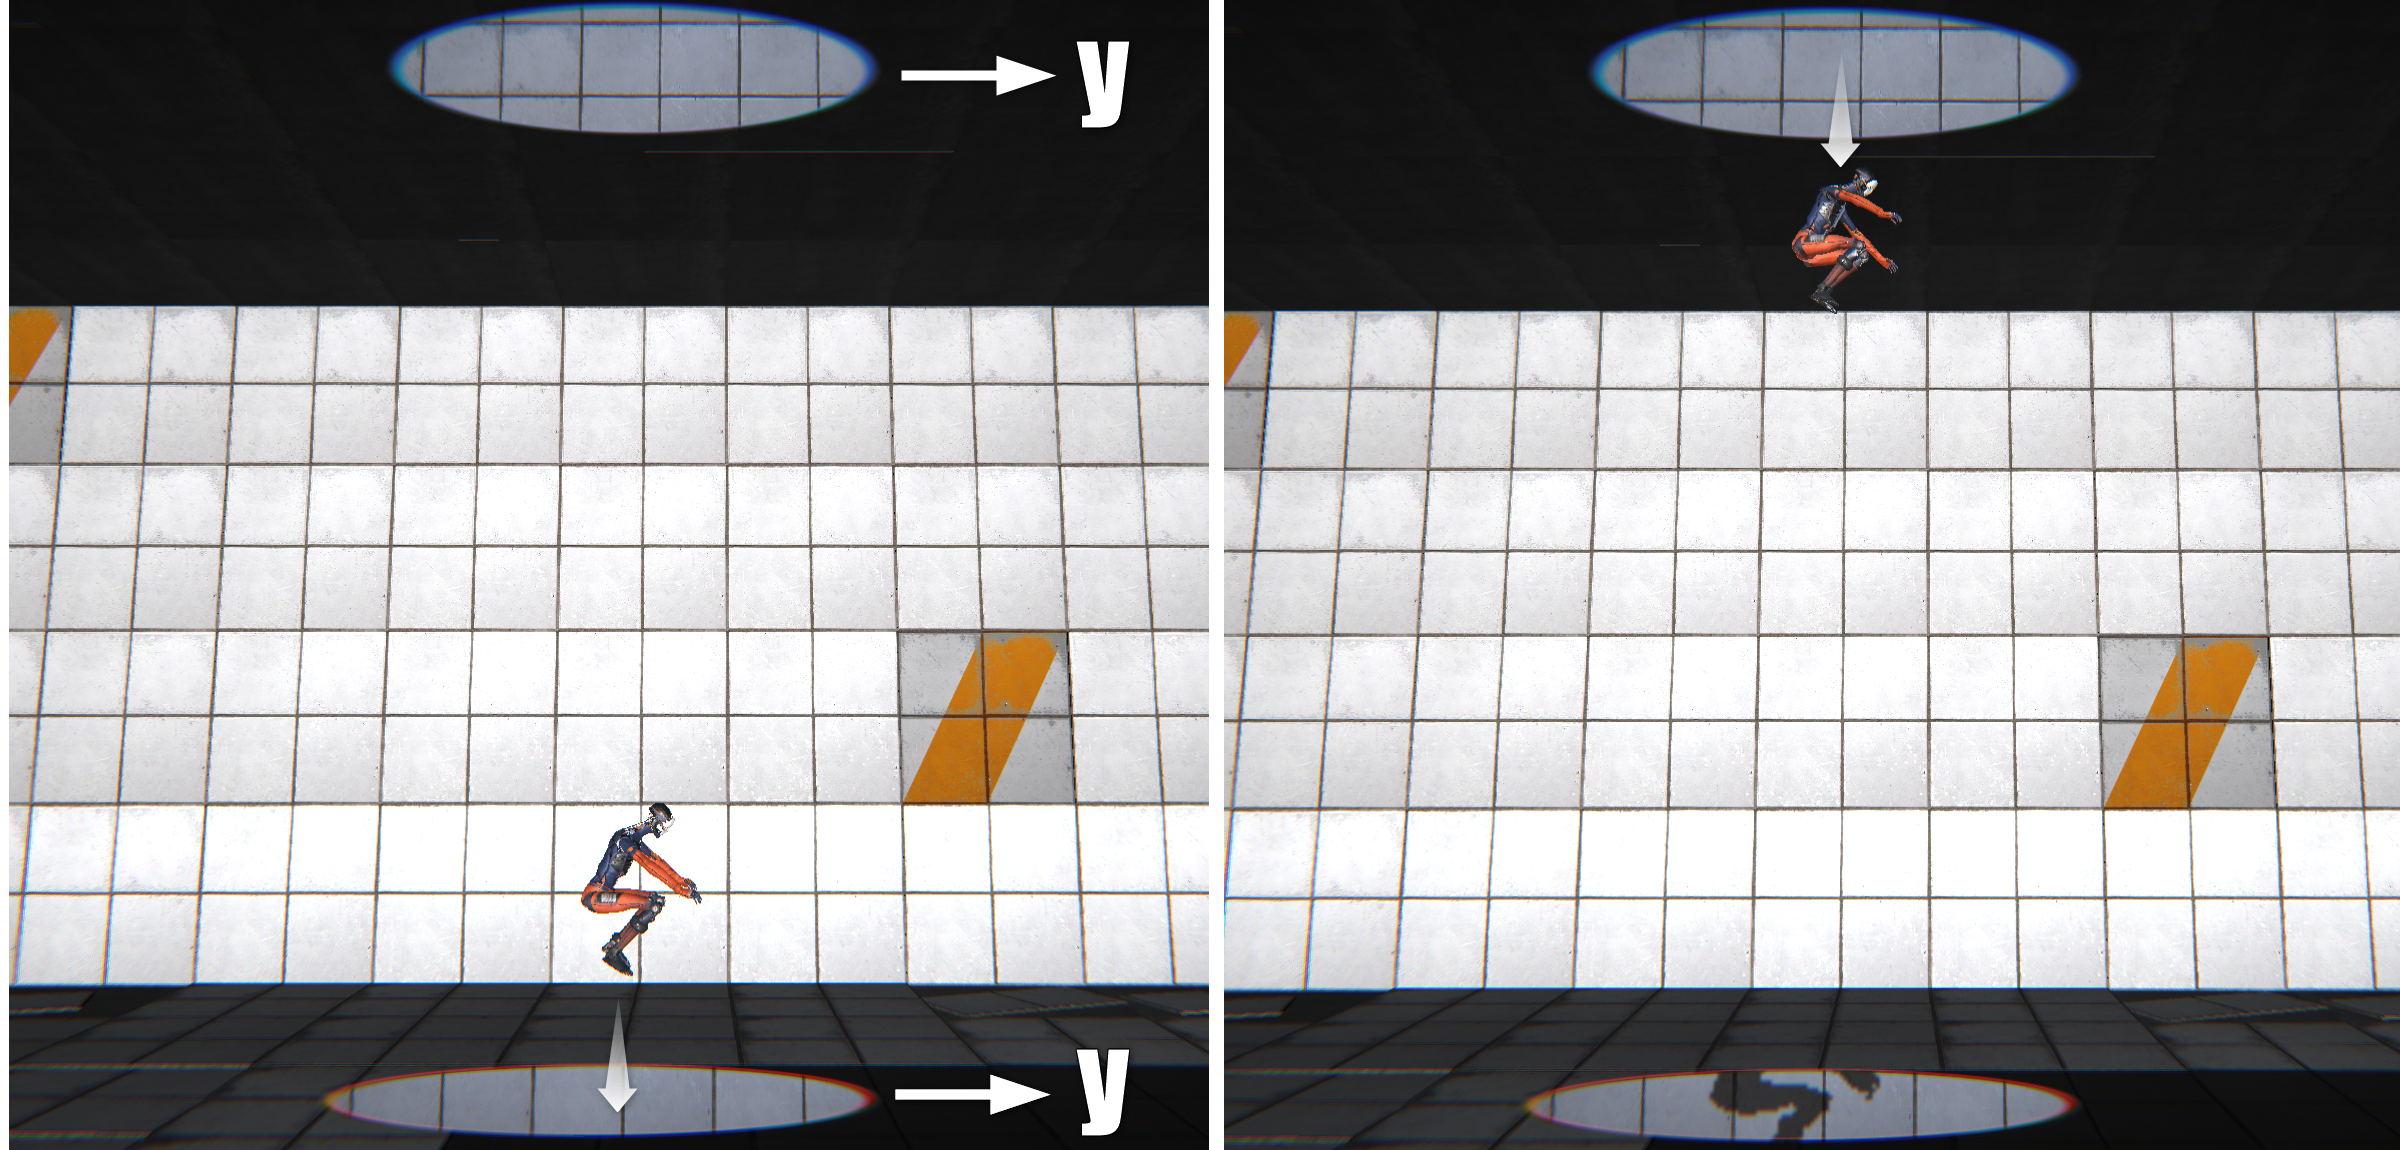
Figure 7.3: Up-vector processing
When the gate opens, you can see the other side of another paired gate (hereinafter referred to as pair gate), so you need to implement this drawing somehow. I took the approach of "preparing another camera (Virtual Camera), capturing it on the Render Texture, pasting it on the Portal Gate, and drawing with the main camera " to draw the "other side" .
Virtual Camera is a camera that captures pictures on the other side of the gate.
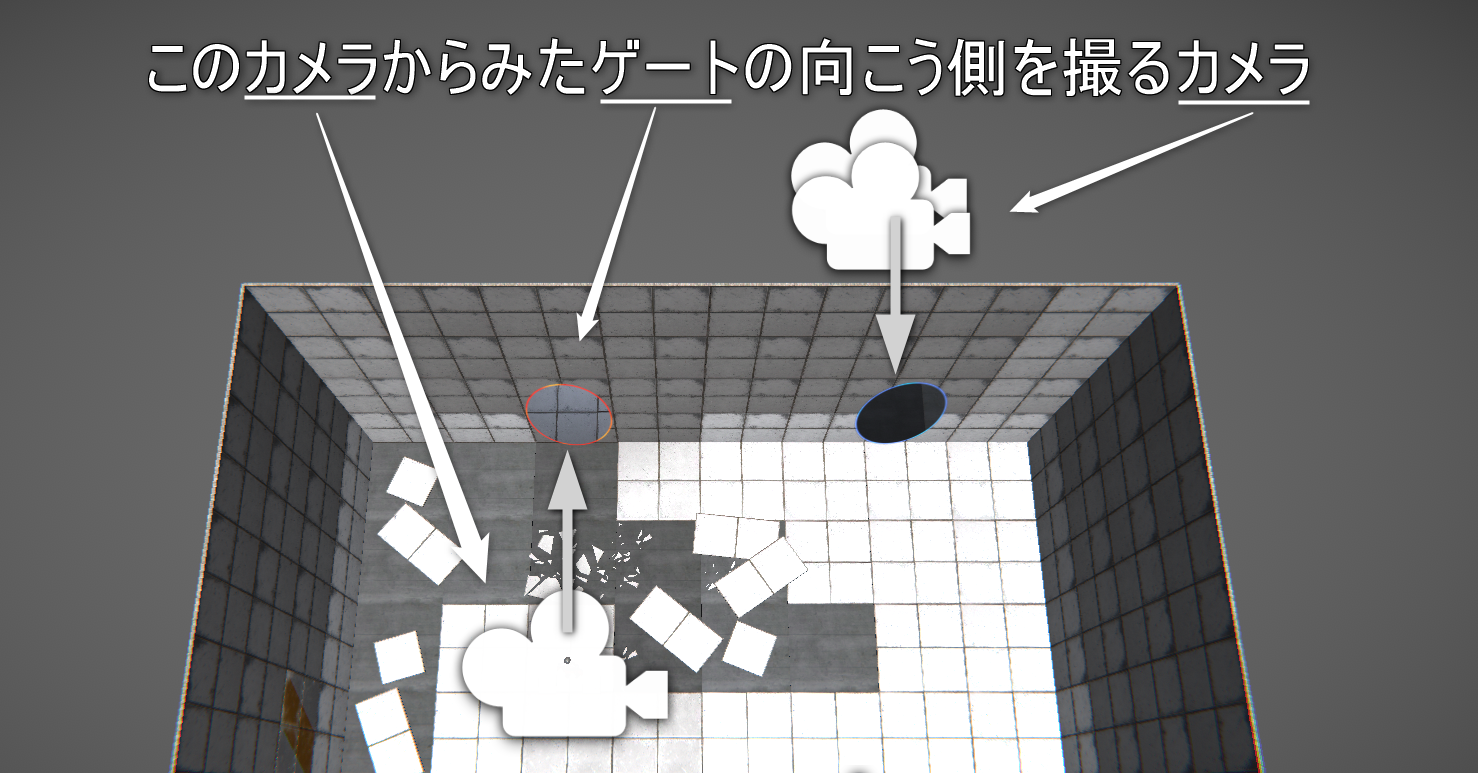
図7.4: VirtualCamera
PortalGate.OnWillRenderObject()Is called for each camera, so if Virtual Camera is required at that timing, it will be generated.
PortalGate.cs
private void OnWillRenderObject ()
{
~ Omitted ~
    VirtualCamera pairVC;
    if (!pairVCTable.TryGetValue(cam, out pairVC))
    {
        if ((vc == null) || vc.generation < maxGeneration)
        {
            pairVC = pairVCTable[cam] = CreateVirtualCamera(cam, vc);
            return;
        }
    }

~ Omitted ~
}
When the gates face each other, the gate is reflected in the scenery on the other side, and the gate is also on the other side of the gate.
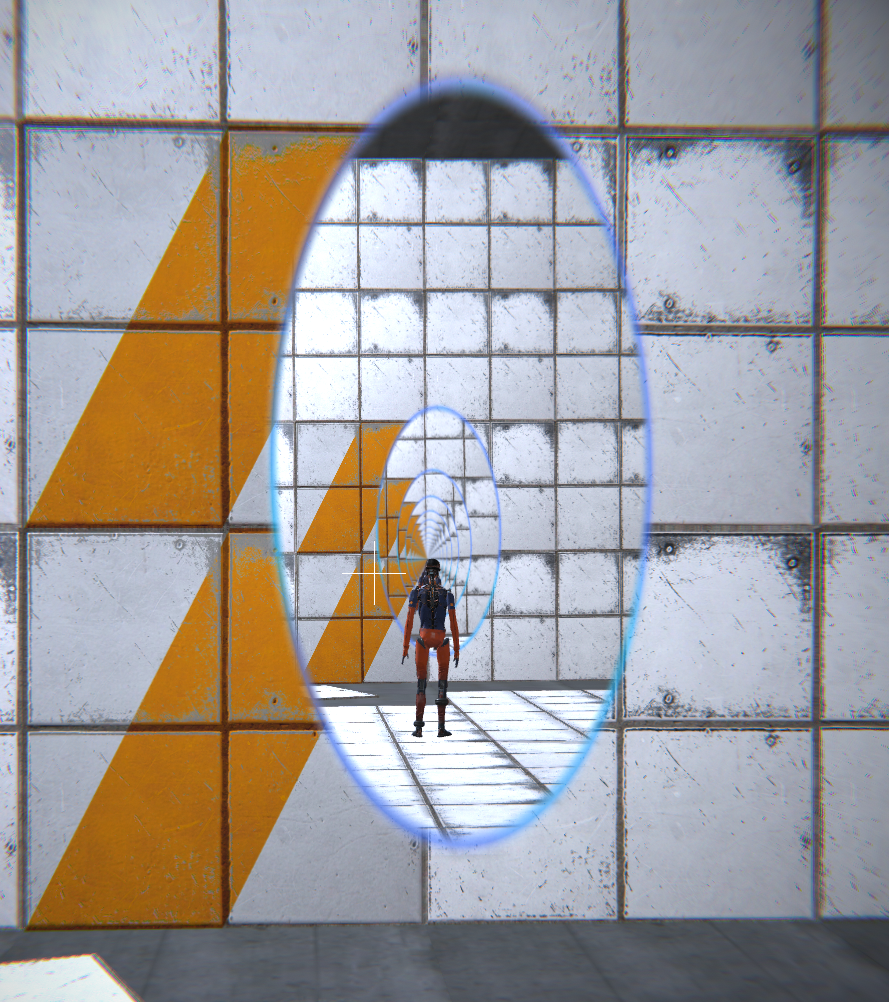
Figure 7.5: Facing gates
in this case,
If you implement it honestly, you will need an infinite number of Virtual Cameras. This is not the case, so PortalGate.maxGenerationI will limit the number of generations, and although it is not an accurate picture, I will substitute it by pasting the texture one frame before to the gate.
PortalGate.cs
VirtualCamera CreateVirtualCamera(Camera parentCam, VirtualCamera parentVC)
{
    var rootCam = parentVC?.rootCamera ?? parentCam;
    var generation = parentVC?.generation + 1 ?? 1;

    var go = Instantiate(virtualCameraPrefab);
    go.name = rootCam.name + "_virtual" + generation;
    go.transform.SetParent(transform);

    var vc = go.GetComponent<VirtualCamera>();
    vc.rootCamera = rootCam;
    vc.parentCamera = parentCam;
    vc.parentGate = this;
    vc.generation = generation;

    vc.Init ();

    return you;
}
VirtualCamera.rootCameraIs the main camera that dates back to the generation of Virtual Camera. In addition, the parent camera, target gate, generation, etc. are set.
VirtualCamera.cs
public void Init()
{
    camera_.aspect = rootCamera.aspect;
    camera_.fieldOfView = rootCamera.fieldOfView;
    camera_.nearClipPlane = rootCamera.nearClipPlane;
    camera_.farClipPlane = rootCamera.farClipPlane;
    camera_.cullingMask |= LayerMask.GetMask(new[] { PlayerLayerName });
    camera_.depth = parentCamera.depth - 1;

    camera_.targetTexture = tex0;
    currentTex0 = true;
}
VirtualCamera.Init()The parameters are inherited from the parent camera. Since my character is reflected in Virtual Camera, the Player layer is deleted from Culling Mask . Also, because you want to capture a picture earlier than the parent of the camera parentCamera.depth - 1has been.
Camera.CopyFrom()I used it at the beginning , but it seems that CommandBuffer is also copied, and an error occurred when using it together with PostProcessingStack * 5 used for post effect, so I copied it for each property.
[*5] https://github.com/Unity-Technologies/PostProcessing
VirtualCamera PortalGate.maxGenerationcan do more as the processing is lighter, so I pay a little attention to performance so as not to waste processing.
VirtualCamera.cs
private void LateUpdate()
{
    // PreviewCamera etc. seems to be null at this timing, so check
    if (parentCamera == null)
    {
        Destroy(gameObject);
        return;
    }

    camera_.enabled = parentGate.IsVisible(parentCamera);
    if (camera_.enabled)
    {
        var parentCamTrans = parentCamera.transform;
        var parentGateTrans = parentGate.transform;

        parentGate.UpdateTransformOnPair(
            transform,
            parentCamTrans.position,
            parentCamTrans.rotation
            );


        UpdateCamera();
    }
}
I will follow this code in detail.
If the parent camera does not show the gate, you do not need to prepare the picture on the other side, so disable the camera of Virtual Camera.
PortalGate.cs
public bool IsVisible(Camera camera)
{
    var ret = false;

    var pos = transform.position;
    var camPos = camera.transform.position;

    var camToGateDir = (pos - camPos).normalized;
    var dot = Vector3.Dot(camToGateDir, transform.forward);
    if (dot > 0f)
    {
        var planes = GeometryUtility.CalculateFrustumPlanes(camera);
        ret = GeometryUtility.TestPlanesAABB(planes, coll.bounds);
    }

    return ret;
}
The visibility judgment is as follows.
parentGate.UpdateTransformOnPair() In, "From the position and orientation of the parent camera with respect to the parent gate, find the position and orientation of the parent pair with respect to the gate and update the transform".
PortalGate.cs
public void UpdateTransformOnPair(
    Transform trans,
    Vector3 worldPos,
    Quaternion worldRot
    )
{
    var localPos = transform.InverseTransformPoint(worldPos);
    var localRot = Quaternion.Inverse(transform.rotation) * worldRot;

    var pairGateTrans = pair.transform;
    var gateRot = pair.gateRot;
    var pos = pairGateTrans.TransformPoint(gateRot * localPos);
    var rot = pairGateTrans.rotation * gateRot * localRot;

    trans.SetPositionAndRotation(pos, rot);
}
The implementation looks like this,
It is the procedure. gateRot
public Quaternion gateRot { get; } = Quaternion.Euler(0f, 180f, 0f);
And, I rotate it 180 degrees on the Y axis, but since the Z value should be inverted
public Quaternion gateRot { get; } = Quaterion.Euler(180f, 0f, 0f);
Even an implementation like this should not break down. However, since the upward direction is reversed between the front and the back of the gate, when you pass through the gate, your character's head will be on the ground side, which makes you feel uncomfortable, so Y-axis rotation seems to be good.
VirtualCamera.cs
void UpdateCamera()
{
    var pair = parentGate.pair;
    var pairTrans = pair.transform;
    var mesh = pair.GetComponent<MeshFilter>().sharedMesh;
    var vtxList = mesh.vertices
                  .Select(vtx => pairTrans.TransformPoint(vtx)).ToList();

    TargetCameraUtility.Update(camera_, vtxList);

    // Oblique
    // Draw only the back of pairGate = match nearClipPlane with pairGate
    var pairGateTrans = parentGate.pair.transform;
    var clipPlane = CalcPlane(camera_,
                              pairGateTrans.position,
                              -pairGateTrans.forward);

    camera_.projectionMatrix = camera_.CalculateObliqueMatrix(clipPlane);
}

Vector4 CalcPlane(Camera cam, Vector3 pos, Vector3 normal)
{
    var viewMat = cam.worldToCameraMatrix;

    var normalOnView = viewMat.MultiplyVector(normal).normalized;
    var posOnView = viewMat.MultiplyPoint (pos);

    return new Vector4(
        normalOnView.x,
        normalOnView.y,
        normalOnView.z,
        -Vector3.Dot(normalOnView, posOnView)
        );
}
Virtual Camera wants to be as light as possible, so make the view frustum as narrow as possible. Since it is only necessary to draw the range of the pair gate seen through VirtualCamera, the vertices of the pair gate mesh are set to world coordinates, and the TargetCameraUtility.Update()view frustum is Camera.rectchanged so that the vertices fit in .
Also, since the object between the Virtual Camera and the pair gate is not drawn, make the near clip surface of the camera the same plane as the pair gate. Camera.CalculateObliqueMatrix()You can do this with . Since there is not much documentation, it will be judged from the sample code etc., but it seems that the near clip plane is passed by Vector4 with the normal to xyz and the distance to w in the view coordinate system.
What is drawn is different according to the state, but it is done with a single shader.
PortalGate.maxGenerationIf you reach and there is no Virtual Camera, paste the picture one frame before to PortalGate.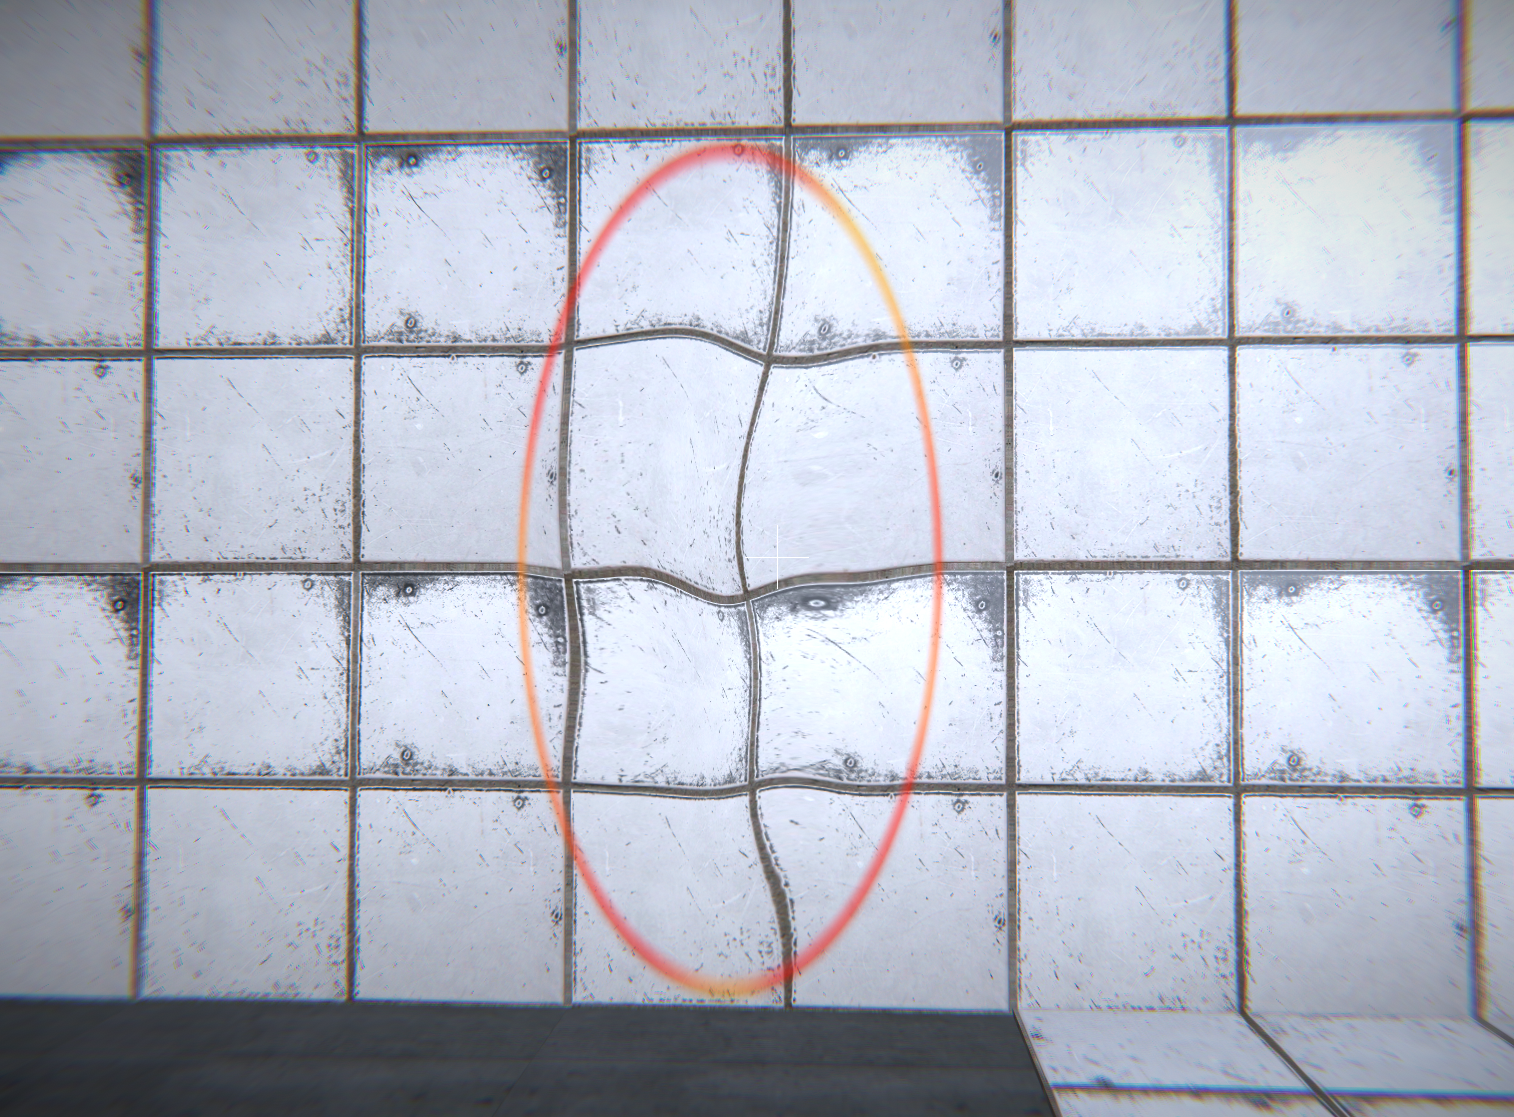
Figure 7.6: The background is moody when there is no pair gate
PortalGate.shader
GrabPass
{
    "_BackgroundTexture"
}
First , capture the background with GrabPass * 6 .
[*6] https://docs.unity3d.com/ja/current/Manual/SL-GrabPass.html
PortalGate.shader
v2f vert(appdata_img In)
{
    v2f o;

    float3 posWorld = mul(unity_ObjectToWorld, float4(In.vertex.xyz, 1)).xyz;
    float4 clipPos = mul(UNITY_MATRIX_VP, float4(posWorld, 1));
    float4 clipPosOnMain = mul(_MainCameraViewProj, float4(posWorld, 1));

    o.pos = clipPos;
    o.uv = In.texcoord;
    o.sposOnMain = ComputeScreenPos(clipPosOnMain);
    o.grabPos = ComputeGrabScreenPos (o.pos);
    return o;
}
The vertex shader looks like this. We are looking for two positions in the screen coordinate system, one for the current camera and one for clipPosthe main camera clipPosOnMain. The former is used for normal rendering, and the latter is used for referencing RenderTexture captured by Virtual Camera. Also, when using GrabPass, there is a dedicated position calculation function, so use this.
PortalGate.shader
float2 uv = In.uv.xy;
uv = (uv - 0.5) * 2; // map 0~1 to -1~1
float insideRate = (1 - length(uv)) * _OpenRate;
insideRate(Inside ratio of the circle) is calculated. The center of the circle is 1, the circumference is 0, and the outside is negative. _OpenRateYou can change the opening degree of the circle with. It is controlled by PortalGate.Open () .
PortalGate.shader
// background
float4 grabUV = In.grabPos;
float2 grabOffset = float2(
    snoise(float3(uv, _Time.y     )),
    snoise(float3(uv, _Time.y + 10))
);
grabUV.xy += grabOffset * 0.3 * insideRate;
float4 bgColor = tex2Dproj(_BackgroundTexture, grabUV);
It is generating a moody background. snoiseIs a function defined in the included Noise.cginc and is SimplexNoise. The grab UV is rocking with the uv value and time. By multiplying the insideRate, the fluctuation becomes larger toward the center.
PortalGate.shader
// portal other side
float2 sUV = In.sposOnMain.xy / In.sposOnMain.w;
float4 sideColor = tex2D(_MainTex, sUV);
It is a picture of the other side of the gate. _MainTexContains the texture captured by the Virutual Camera and is referenced by the UV value of the main camera.
PortalGate.shader
// color
float4 col = lerp(bgColor, sideColor, _ConnectRate);
bgColorsideColorI mix (walls and floors) and (beyond the gate). _ConnectRateTransitions from 0 to 1 when a pair gate is created and remains at 1 thereafter.
PortalGate.shader
// frame
float frame = smoothstep(0, 0.1, insideRate);
float frameColorRate = 1 - abs(frame - 0.5) * 2;
float mixRate = saturate(grabOffset.x + grabOffset.y);
float3 frameColor = lerp(_FrameColor0, _FrameColor1, mixRate);
col.xyz = lerp(col.xyz, frameColor, frameColorRate);

col.a = frame;
Finally, the frame is calculated. insideRateThe edges of are _FrameColor0,_FrameColor1displayed by mixing them appropriately.
The appearance is completed so far. Next, let's focus on the physical behavior.
Changed to process around warp in PortalObj component . GameObjects with this will be able to warp.
The plane on which the gate is installed cannot pass through, that is, there is a collision. This must be disabled when passing through the gate. Actually, the gate is equipped with a collider that pops out rather large in the front and back as a trigger. PortalObj uses this collider as a trigger to invalidate the collision with the plane.
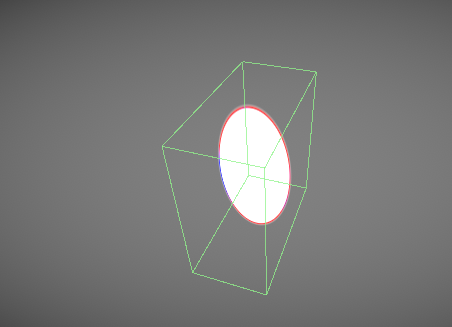
Figure 7.7: Gate Collider
PortalObj.cs
private void OnTriggerStay(Collider other)
{
    var gate = other.GetComponent<PortalGate>();
    if ((gate != null) && !touchingGates.Contains(gate) && (gate.pair != null))
    {
        touchingGates.Add(gate);
        Physics.IgnoreCollision(gate.hitColl, collider_, true);
    }
}

private void OnTriggerExit(Collider other)
{
    var gate = other.GetComponent<PortalGate>();
    if (gate != null)
    {
        touchingGates.Remove(gate);
        Physics.IgnoreCollision(gate.hitColl, collider_, false);
    }
}
OnTriggerEnder()The OnTriggerStay()reason for this is that if there is only one gate and there is no pair, Enter will be performed and then a pair will be created. First tougingGates, register the gate that triggered it in . The above PortalGate.hitCollis finally coming out. Physics.IgnoreCollision()Set this and your collider to ignore the collision with.
OnTriggerExit()The collision is enabled again with. As many of you may have noticed, since PortalGate.hitCollis a collider on the entire plane, it can actually pass through even outside the frame of the Portal Gate. The condition "as long as you keep OnTriggerStay ()" is attached, so it is not very noticeable, but it seems that a little more complicated processing is required to collide in the form of a proper gate.
PortalObj.cs
private void Update()
{
    var passedGate = touchingGates.FirstOrDefault(gate =>
    {
        var posOnGate = gate.transform.InverseTransformPoint(center.position);
        return posOnGate.z > 0f;
    });


    if (passedGate != null)
    {
        PassGate(passedGate);
    }

    if ((rigidbody_ != null) && !rigidbody_.useGravity)
    {
        if ((Time.time - ignoreGravityStartTime)  > ignoreGravityTime)
        {
            rigidbody_.useGravity = true;
        }
    }
}
centerIs a Transform used to determine if it has passed the gate. Basically, the GameObject with PortalObj component is fine, but I want to warp my character when the camera passes, not the center of the character, so I can set it manually. center.positionWe are checking z > 0fif there is a gate with (behind the gate) touchingGates. If such a gate is found PassGate()(warp processing).
Also, as will be described later, Portal Obj disables gravity immediately after passing through the gate. This is done to make the object behave with a little inertia after passing because if you open a gate that connects to another floor under the object that is falling on the ground, the object will vibrate back and forth between the gates. I have.
PortalObj.cs
void PassGate(PortalGate gate)
{
    gate.UpdateTransformOnPair(transform);

    if (rigidbody_ != null)
    {
        rigidbody_.velocity = gate.UpdateDirOnPair(rigidbody_.velocity);
        rigidbody_.useGravity = false;
        ignoreGravityStartTime = Time.time;
    }

    if (fpController != null)
    {
        fpController.m_MoveDir = gate.UpdateDirOnPair(fpController.m_MoveDir);
        fpController.InitMouseLook();
    }
}
The warp process looks like this. I also used it to find the position of the Virtual PortalGate.UpdateTransformOnPair()Camera and warp the Transform. RigidBodyIf you have, change the direction of speed as well. fpControllerThe same applies to (script for own character operation). As this area becomes larger, there will be objects that need more support, so it may be better to prepare each script callback and notify it.
There was a point that I had to implement a warp this time and pack some more.
I wanted to somehow nullify the collision after the physics engine made a collision detection and before extrusion, but I couldn't find a good way. OnTriggerEnter(), OnCollisionEnter()The inner Physics.IgnoreCollision()seems to be referred to are disabled from after a collision once. I think On~Enter()it Physics.IgnoreCollision()'s probably a little late to reflect what is called after extrusion . For this reason, the range of the trigger is made to protrude considerably so that the frame that enters the trigger and the frame that collides with the wall are different. However, this method has its limitations and is not compatible with Portal Obj, which moves at a higher speed. If anyone says "There is such a way!", Please contact me!
I implemented the warp by "rewriting the position of the object" , but strictly speaking, there should be a state where it is half in front and half behind while passing through the gate. If you want to put out a large object, it will be noticeable, so you need to think about this as well. In addition, it needs to be affected by collisions both in front and behind, and more strictly, I feel that we have to intervene in the solver in the physics engine. It seems to be strict with Unity, so I feel that it is realistic to cheat well.
I tried to reproduce Portal that I wanted to try from before with Unity. I tried it comfortably for the first time by stacking the cameras, but I found that it was more difficult than I expected. Among CG and game technologies, those that are closer to the real world are in high demand and are becoming more and more standardized. When it becomes easier to create a sense of reality, Anywhere Door-like "ideas that used to be common but unrealistic and slept" may come to life as a new experience.